
Unlocking the Power of SSR and SSG with Next.js: Supercharge Your Data-Driven Web Apps

In today's web development landscape, where user experience reigns supreme, optimizing initial load times and Search Engine Optimization (SEO) are crucial. This is especially true for data-driven applications that rely on dynamic content. Here's where Next.js, a React-based framework, steps in, offering the best of both worlds: Server-Side Rendering (SSR) and Static Site Generation (SSG).
Benefits of SSR and SSG: A Perfect Blend for SEO and Performance
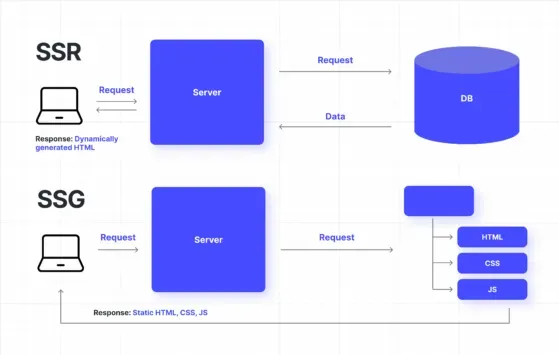
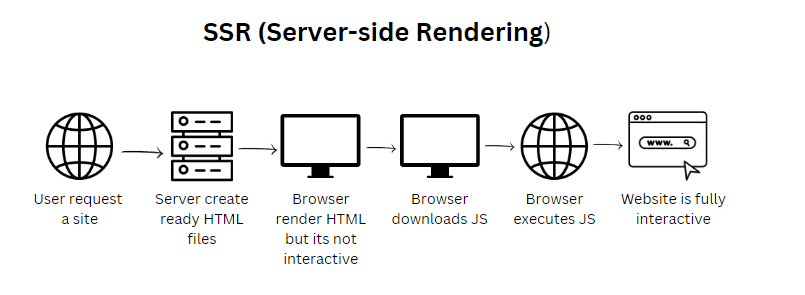
- SEO Advantage with SSR: Search engines love pre-rendered content, and SSR ensures your website is fully rendered on the server, including SEO-critical elements like meta descriptions and title tags. This allows search engines to easily crawl and index your content, boosting your website's ranking potential.
- Blazing-Fast Load Times with SSG: SSG pre-renders pages at build time, resulting in lightning-fast initial page loads. This is ideal for content-heavy websites like blogs or e-commerce product listings where content updates are less frequent. Users see the content instantly, leading to a significantly improved user experience.
Enter Next.js: The Hybrid Hero
Next.js bridges the gap between traditional client-side rendering and server-side solutions. It provides features for both SSR and SSG, allowing you to choose the best rendering approach for each page of your application.
Here's a breakdown of how Next.js achieves this:
- Server-Side Rendering with
getServerSideProps: Next.js offers thegetServerSidePropsfunction, which lets you fetch data on the server for each request. This ensures your pages are always up-to-date with the latest information, ideal for dynamic content like user dashboards or personalized recommendations. - Static Site Generation with
getStaticProps: For content that doesn't change frequently, Next.js provides thegetStaticPropsfunction. This function allows you to pre-render pages at build time, including any necessary data fetching. This approach significantly improves initial load times and reduces server load.
Choosing the Right Rendering Approach: SSR vs. SSG
The optimal rendering approach depends on your web application's specific needs:
- SSR for Dynamic Content: If your application relies heavily on user interaction, real-time data updates, or personalized content, SSR is the way to go. E-commerce stores with dynamic shopping carts or social media platforms with live feeds are prime examples.
- SSG for Content-Heavy Websites: For content-driven websites like blogs, news portals, or landing pages with static content, SSG shines. Pre-rendered pages ensure exceptional initial load times, even for users with slow internet connections.
Code Examples and Walkthroughs: Getting Started with Next.js (React and Angular)
Setting up SSR with Next.js (React):
- Create a Next.js project: Use
npx create-next-app my-app. - Create a page component: For example, create a page named
about.jsinside thepagesdirectory. - Implement
getServerSideProps: Insideabout.js, define an async function namedgetServerSideProps. This function can fetch data from an API or database.
export async function getServerSideProps() {
  const res = await fetch('https://api.example.com/about');
  const aboutData = await res.json();
  return { props: { aboutData } };
}

function AboutPage({ aboutData }) {
  return (
    <div>
      <h1>About Us</h1>
      <p>{aboutData.content}</p>
    </div>
  );
}

export default AboutPage;
Setting up SSG with Next.js (React):
- Follow steps 1 and 2 from the SSR example.
- Implement
getStaticProps: Instead ofgetServerSideProps, usegetStaticProps. This function also fetches data but runs at build time, pre-rendering the page.
export async function getStaticProps() {
  const res = await fetch('https://api.example.com/about');
  const aboutData = await res.json();
  return { props: { aboutData } };
}

function AboutPage({ aboutData }) {
  return (
    <div>
      <h1>About Us</h1>
      <p>{aboutData.content}</p>
    </div>
  );
}

export default AboutPage;
Using Next.js with Angular (Bridge.js)
While Next.js itself is a React framework, you can leverage interoperability libraries like Bridge.js to integrate its rendering capabilities into an existing Angular project. Here's a basic example:
1 Setting Up Bridge.js:
- Install Bridge.js in your Angular project:
npm install bridge.js - Follow the Bridge.js setup instructions to configure routing and communication between Angular and Next.js components.
npm install bridge.js2 Creating a Next.js Component:
- reate a Next.js project using
npx create-next-app my-next-component - Develop your desired Next.js component within this separate project.
npx create-next-app my-next-component3 Integrating Next.js Component into Angular:
- Use Bridge.js to register the Next.js component as a custom Angular element. This allows you to embed the Next.js component within your Angular templates.
- Within your Angular component template, use the registered custom element selector to render the Next.js component.
Here's a simplified code example (refer to Bridge.js documentation for detailed implementation):
Angular Component (using Bridge.js):
<bridge-next-component [props]="{ data: someData }"></bridge-next-component>Next.js Component (pages/my-component.js):
function MyComponent({ data }) {
  return (
    <div>
      <h1>Data from Angular: {data}</h1>
      {/* Your Next.js component logic here */}
    </div>
  );
}

export default MyComponent;
Important Considerations:
- Bridge.js provides a basic level of interoperability. Complex interactions between Angular and Next.js components might require additional development effort.
- Consider the trade-offs between maintaining separate codebases and the potential benefits of a unified framework like Nx (mentioned earlier) that can handle both React and Angular within a single project.
Conclusion:
Next.js, with its SSR and SSG capabilities, empowers you to build performant and SEO-friendly web applications. This blog post explored the benefits of these rendering approaches and how Next.js facilitates their implementation, along with code examples for React-based projects. We also briefly touched upon integrating Next.js with Angular using Bridge.js. Remember, the choice of frameworks and rendering strategies ultimately depends on your specific project requirements and team expertise. By understanding these concepts and their practical application, you can create exceptional user experiences that rank well in search engines.